Pencil Method
“Stop doing pencil”
-Rafflesia
A somewhat risky CrOS unenrollment method that involves bridging two pins on the SPI flash chip of the motherboard. It is recommended that you do not use this.
Requirements
Section titled “Requirements”- Screwdriver
- Conductive bendable object
- Sh1mmer USB
-
Open up your Chromebook using, most likely, a Phillips screwdriver. After that, disconnect the battery on the Chromebook. Methods to disconnect the connector may vary on each model.
-
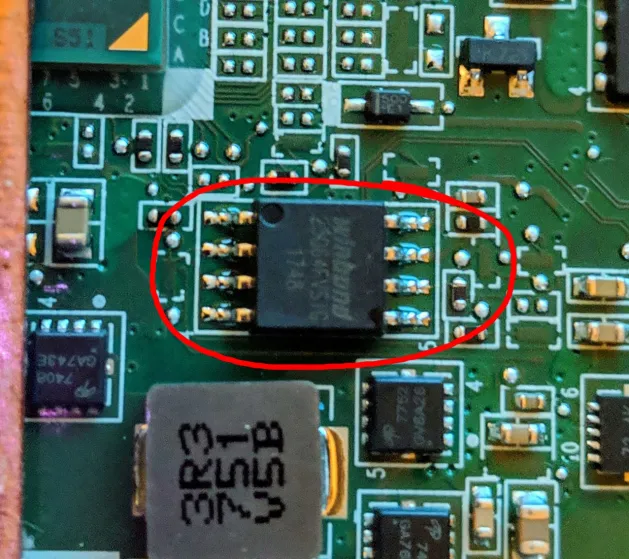
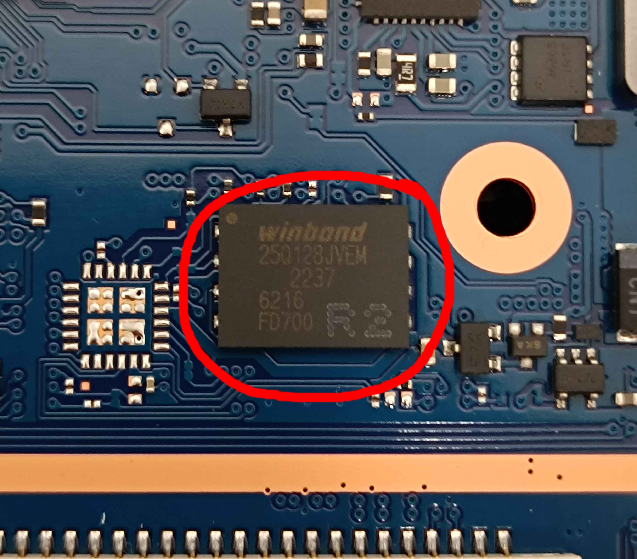
Look around the Chromebook motherboard and look for a small 8-pin chip with pins sticking out or in. These chips tend to have WINBOND or GIGADEVICE branding, and may either say 25Q64[xx] or 25Q128[xx] right below the branding. You may need to flip over the motherboard to find this chip.
-
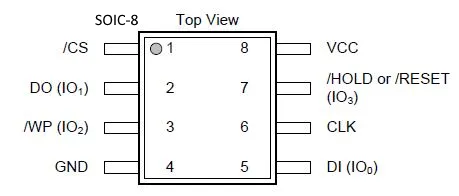
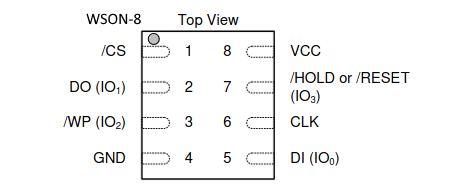
Now you’re going to have to use the picture(s) below as reference on what pins to bridge, as this is important. These are the charts for both of the chips:
-
“How do you bridge these pins?” This is where the supplies you got earlier comes into play, as they’ll be how you can bridge these pins.
Take a piece of your conductive material and shape it into something that’s long enough to get to either side of the chip while being small enough to not make contact with multiple pins on either side of the chip. I cannot provide measurements as the chip size is different on each model.
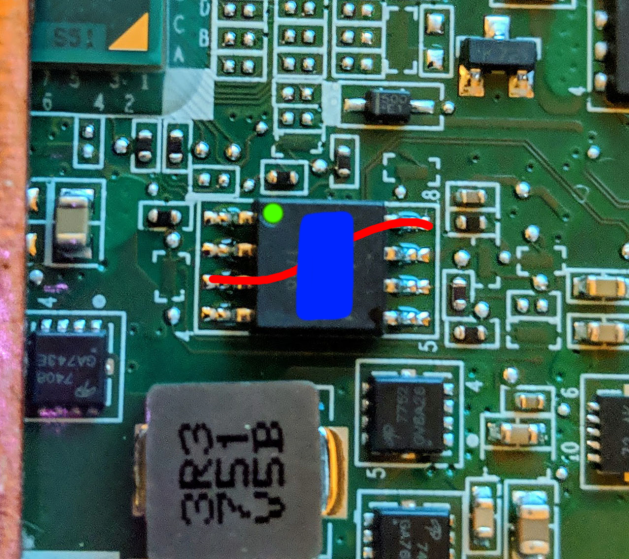
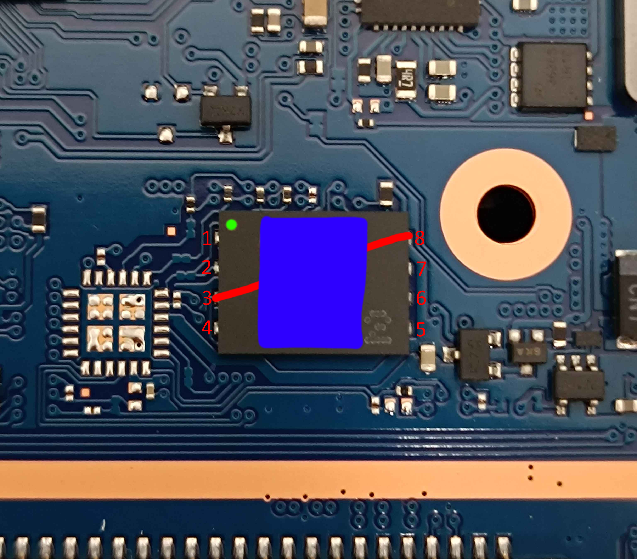
Through using the charts listed above, look for the circle/indent on the chip so you can know where each pin is located. From here, take your conductive material and place one end on pin 3 (WP) and place the other end on pin 8 (VCC). MAKE SURE it’s making contact with the pins and IS NOT making contact with other nearby pins. You may place tape on top of the chip to keep the conductive material on the pins, but that’s if you have to.
Use the picture below to know where to put your conductive material and tape:
- Green: Indent / Circle
- Red: Conductive Material
- Blue: Tape
-
After the pins are securely bridged, you may plug in the charger (or the battery) alongside all the other necessary cables and boot the Chromebook. Once it has booted, boot into SH1MMER as you normally would. Disable OS verification (blocked or not), boot into the “Insert Recovery Media” screen, and plug in your SH1MMER USB or SD card.
Enter the Utilities screen and run “Un-Enroll Device” (or “Deprovision Device” if Legacy). This won’t do anything currently, but it’s a necessary step. After that, enter the Bash Shell and then run the following commands.
flashrom --wp-disable/usr/share/vboot/bin/set_gbb_flags.sh 0x8090If the commands fails here, you need to repeat the Bridging Pins instructions. However, if the command succeeds, then you may turn off the Chromebook, unplug the power source, and then remove the bridge. This is highly recommended to prevent any accidental damage.
Dealing With An Update
Section titled “Dealing With An Update”For those on v124 or newer, they changed cryptohome to device_management_client. However, this doesn’t remove FWMP due to “a weird quirk of the refactors” and will simply error upon running the command with —action=remove_firmware_management_parameters.
Instead, you’ll need to downgrade ChromeOS to v123 (or lower) with developer mode on to bypass the “ChromeOS is out-of-date” error. If you don’t know how to downgrade, visit the Downgrading section of Versions.
If recovery reports “An unexpected error occurred”, try a different version.