DNS Setup
Get Started
Section titled “Get Started”DNS management is the process of properly getting your domain name pointed to your origin server. This is all done through the management of DNS records. When making any zone changes (set of DNS records), please note that visible changes may take up to 48 hours due to DNS propagation.
The first thing you would need to do is purchase a domain name. A domain name is your website address, and you can purchase a domain name through a registrar. Some good registrars are listed below:
If you prefer to obtain premium domains at a low price, then use Namecheap, which offers domains for good prices. Porkbun provides domains at a decent middleground
If you’re a privacy nut, then use Njalla or IncogNet, who don’t even ask you for WHOIS information, and accept private payment methods like XMR, but may charge more compared to other providers.
Zone Setup
Section titled “Zone Setup”After you have selected a decent VPS (refer to the VPS Hosting guide), use Cloudflare for the DNS records for both the site and the subdomains for the proxies. You could manually do this as well, but Cloudflare is recommended for ease of use.
This is an example of DNS records. Self-hosting will require A records preferably.
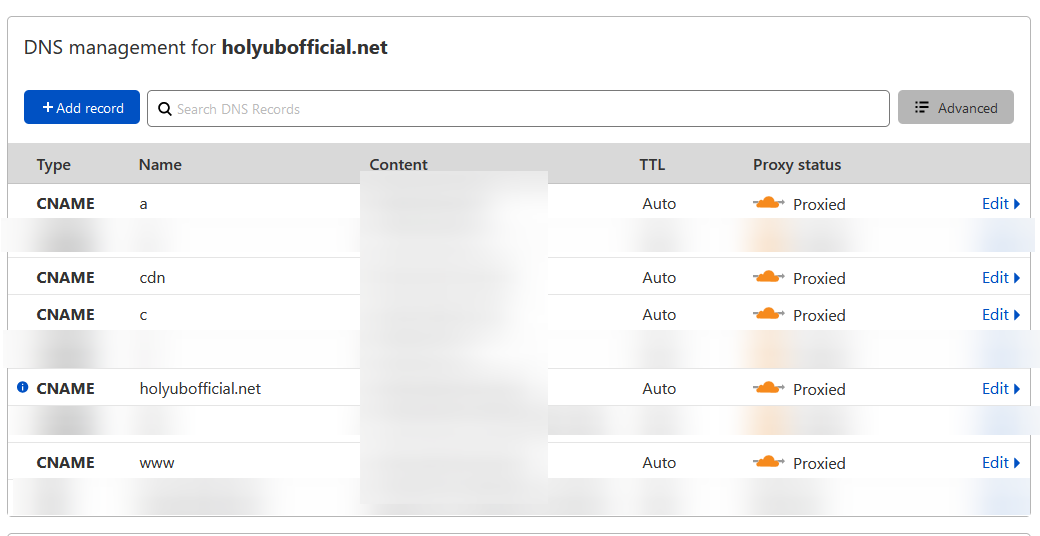
@andwww.example.mlfor the local Ultraviolet proxy or any locally hosted proxy with your frontend; or just your frontendclient.example.mlfor external web proxy #1a.example.mlfor external web proxy #2cdn.example.mlfor a nice external web proxy #3
The actual subdomain is all dependent on your setup.
Cloudflare Steps
Section titled “Cloudflare Steps”Use Cloudflare (make an account), add your domain, and then add your various DNS records to your zone. Make sure you add Cloudflare’s nameservers, which will be given after add your domain name.
Make sure they are CNAME, although A records also work, and try to follow this structure:
CNAME Records (Recommended)
Section titled “CNAME Records (Recommended)”| Type | Name | Target | Purpose |
|---|---|---|---|
CNAME | @ | example-main-record.com | Frontend or Backend Proxy |
CNAME | www | example-main-record.com | Frontend or Backend Proxy |
CNAME | cdn | example-main-record-with-external-proxy.com | External Proxy |
CNAME | rh | example-main-record-with-external-proxy.com | External Proxy |
A Records (Alternative)
Section titled “A Records (Alternative)”OR using your public VPS instance IP (also the steps for setting up the main CNAME record that you could use above):
| Type | Name | Target | Purpose |
|---|---|---|---|
A | @ | 0.0.0.0 | Frontend or Backend Proxy |
A | www | 0.0.0.0 | Frontend or Backend Proxy |
A | cdn | 0.0.0.0 | External Proxy |
A | rh | 0.0.0.0 | External Proxy |
0.0.0.0 being an example IP, you would replace this with your actual VPS instance IP.
A common question here is, “How would I get my public VPS IP to actually be directed to an instance (e.g., PORT)?”
To do this, you need to utilize a reverse web proxy. Essentially, a reverse proxy is a server that sits in front of web servers and forwards client (e.g. web browser) requests to those web servers. Reverse proxies are implemented to help increase security, performance, and reliability, but in this case, for ease of setup.
More information regarding this can be found within the NGINX guide.
Free Hosting Issues
Section titled “Free Hosting Issues”A typical issue that arises with free hosting is adding or managing CNAME/A records to these services. Because you have to use panels, the steps for each may vary, and they might fall under the SSL guide below.
Make sure HTTPS is forced and have SSL set to “Flexible” for free hosting options. Otherwise, you can have SSL set to “Full”. Cloudflare will try to select “Flexible” automatically, so check your setup if you have any issues with DNS management.